Cubi Design Process
Here's an applied example of my design process for Cubi, my Portal 2 community map. You can find Cubi under the Personal Projects section. You can also download Cubi on the Steam Workshop.
Cubi is one of my most successful projects. I am very pleased with how it turned out, and very thankful for how well it was received by the community. Since being released on the Steam Workshop, Cubi has a 5 star rating with over 75,000 total ratings and a 96% positive rating. A very big thanks to everyone who helped playtest Cubi during its development, and a big thanks to the community for playing!
Determine Goals
Before I ever opened the editor, I established goals that would give direction to the map’s development. After thinking about what I wanted to do without backing myself into a corner, I chose the following goals:
Design chambers with quality and style consistent with the Portal 2 campaign
Valve set the bar for the calibur for puzzles a player should expect when playing Portal 2, so I felt it was important to meet that bar
Pick a core gameplay mechanic and use it in different ways throughout the map
A map should have a gameplay focus, so I wanted to find a mechanic that binds the chambers together while providing their own gameplay
Create fresh gameplay by utilizing puzzle elements in different ways than experienced in Portal 2’s campaign
Since it's highly likely that players who play community maps have played through Portal 2's campaign, providing gameplay experiences they have yet to play will keep the map fresh and engaging
Create gameplay dense chambers by utilizing having each puzzle element in a chamber reused during the entire solution
Allowing a chamber's puzzle elements to be used multiple times to solve a chamber provides depth to the puzzle, as well as teaching and reinforcing the puzzle mechanics instead of them functioning as one-time use events
Design chambers that players of all skill levels can solve while more skilled players can still appreciate
Having as wide of an audience as possible enjoy the map is always a goal of mine, so long as the integrity of the design remains intact and the experience fresh
Research and Brainstorm
After establishing the map’s goals, the next step was to collect information on how chambers are made, how mechanics interact with each other, and how the visual language for chambers is presented. There’s a lot of knowledge I carried over from making Conundrum (my Portal 1 map) in regards to higher level puzzle design theory and portal map making, so what’s explained here is less about that and more specific to this map.
Play through the single player campaign multiple times
In order to meet the bar Valve set with the test chambers, it's very important to look at them all carefully to understand how different puzzles are presented to the player and how the mechanics interact with each other
Look at sample maps to see how chambers were constructed with updated tools
Reverse engineering how maps are made allows for a more thorough understanding of the level design work required, such as how to setup different puzzle elements, implement audio, texture rooms, optimize for performance using updated tools and mechanics from Portal 1
Create test maps in Hammer for potential puzzle elements to understand how they work
Setting up test maps for a variety of mechanics helps figure out how they work under the hood and how they can interact with each other. During this time, I made test maps to look at:
Cubes
Tractor beam
Faith plate
Laser, relay, and receiver
Fizzler
Light bridge
Turrets
Paint
Buttons
Switches
Create test maps for potential visual styles for chambers
Portal 2 had four distinct visual styles. While I had a preference for the Clean Room look, I still looked at the following visual styles:
Overgrown
Clean room
Underground
Wheatley chambers
Pick a primary puzzle mechanic for the map’s focus
After making the test maps for the different puzzle elements, and keeping in mind my difficulty goal, I decided to use cubes as my focus (hence the map's name Cubi). Cubes are an easy to understand mechanic that have incredible depth when combined with other supporting puzzle elements, such as buttons, lasers, fizzlers, and faith plates.
Pick a visual style
After looking more in-depth at the different visual styles, and knowing I wanted to use cubes as my gameplay focus, I opted for the Clean Room visual style for the chambers.
Prototype
The Prototype part of the process was broken up by chamber. The order of which I made the chambers is different than the order in which they appeared in the map. Each chamber was made in its own map and tested individually at first, before coming together in one main map after prototyping. I made each chamber one at a time and only moved onto making the next chamber when I felt the current one’s layout and gameplay were solid.
Playtesting and iteration was key here to make sure puzzle felt cohesive, layout worked well, and the difficulty was right. After I felt a chamber was in a playtestable state, I sent the map to playtesters of varying skills and player types. I had them record demos of their initial playthroughs, and they would send those to me along with a short thumbs up or thumbs down rating and brief description about what their high and low points were. This allowed me to iterate on the chambers to get rid of friction points and focus on what the chamber did well.
After iterations were made, I'd send the chamber out to the group again for further testing, including a group of players that have yet to play the chamber so I could see first impressions along side the previous group's feedback on current iterations.
Fizzler Chamber

The fizzler chamber was the first one I made for the map. The goal for this chamber was to test the player's order of operations problem solving skills. The fizzler was used heavily in Portal 1, but not in Portal 2. Fizzlers allow for great order of operations style gameplay, as they require players to think about how and where to place their portals, and the order in which they do it as going through a fizzler removes all placed portals and destroys gameplay elements like cubes. Combining faith plates and tractor beams with the fizzler in test maps allowed for cool ways for players to bypass fizzlers in addition to normal portal usage.
With the fizzler, faith plate, and tractor beam mechanics in place, and knowing the cube needs to be involved as a core mechanic, the first iteration of the puzzle required players to get a cube on the other side of a goo pit by setting up portals to get a tractor beam going over the goo pit on the other side of the fizzler. By using the faith plate, players could jump over the fizzler, into the beam, and ride to the other side. Once on the other side, players would use the beam to get to a switch to drop the cube, then after getting the cube players would reset their portals and portal back to the other side with the cube. Once back on the other side, players would set the cube on one of the buttons, stand on the other, and portal through the exit door.
While this worked, the tractor beam was only used to cross the gap and had no depth beyond that, and the fizzler felt mostly irrelevant as a result. Players felt as though they were along for a ride, instead of solving a puzzle. To fix this, I decided to remove the riding part of the tractor beam from the player standpoint and instead have players grab the cube with the beam. During my test mapping, I discovered that you can suspend objects with the beam and instantaneously change the beam's direction while keeping the object in it. This isn't utilized too much in the Portal 2 campaign, so it felt right to use it here to obfuscate the solution to getting the cube across. This trick combined with moving the cube dispenser and button on opposite sides of the fizzler from each other made the fizzler more relevant in the solution

The resulting iterations proved very successful. It gave more depth to the tractor beam, made the fizzler core to the puzzle, and players utilized the faith plates multiple times solving the chamber. It also had the side benefit of reducing the chamber's foot print simplifying the layout.
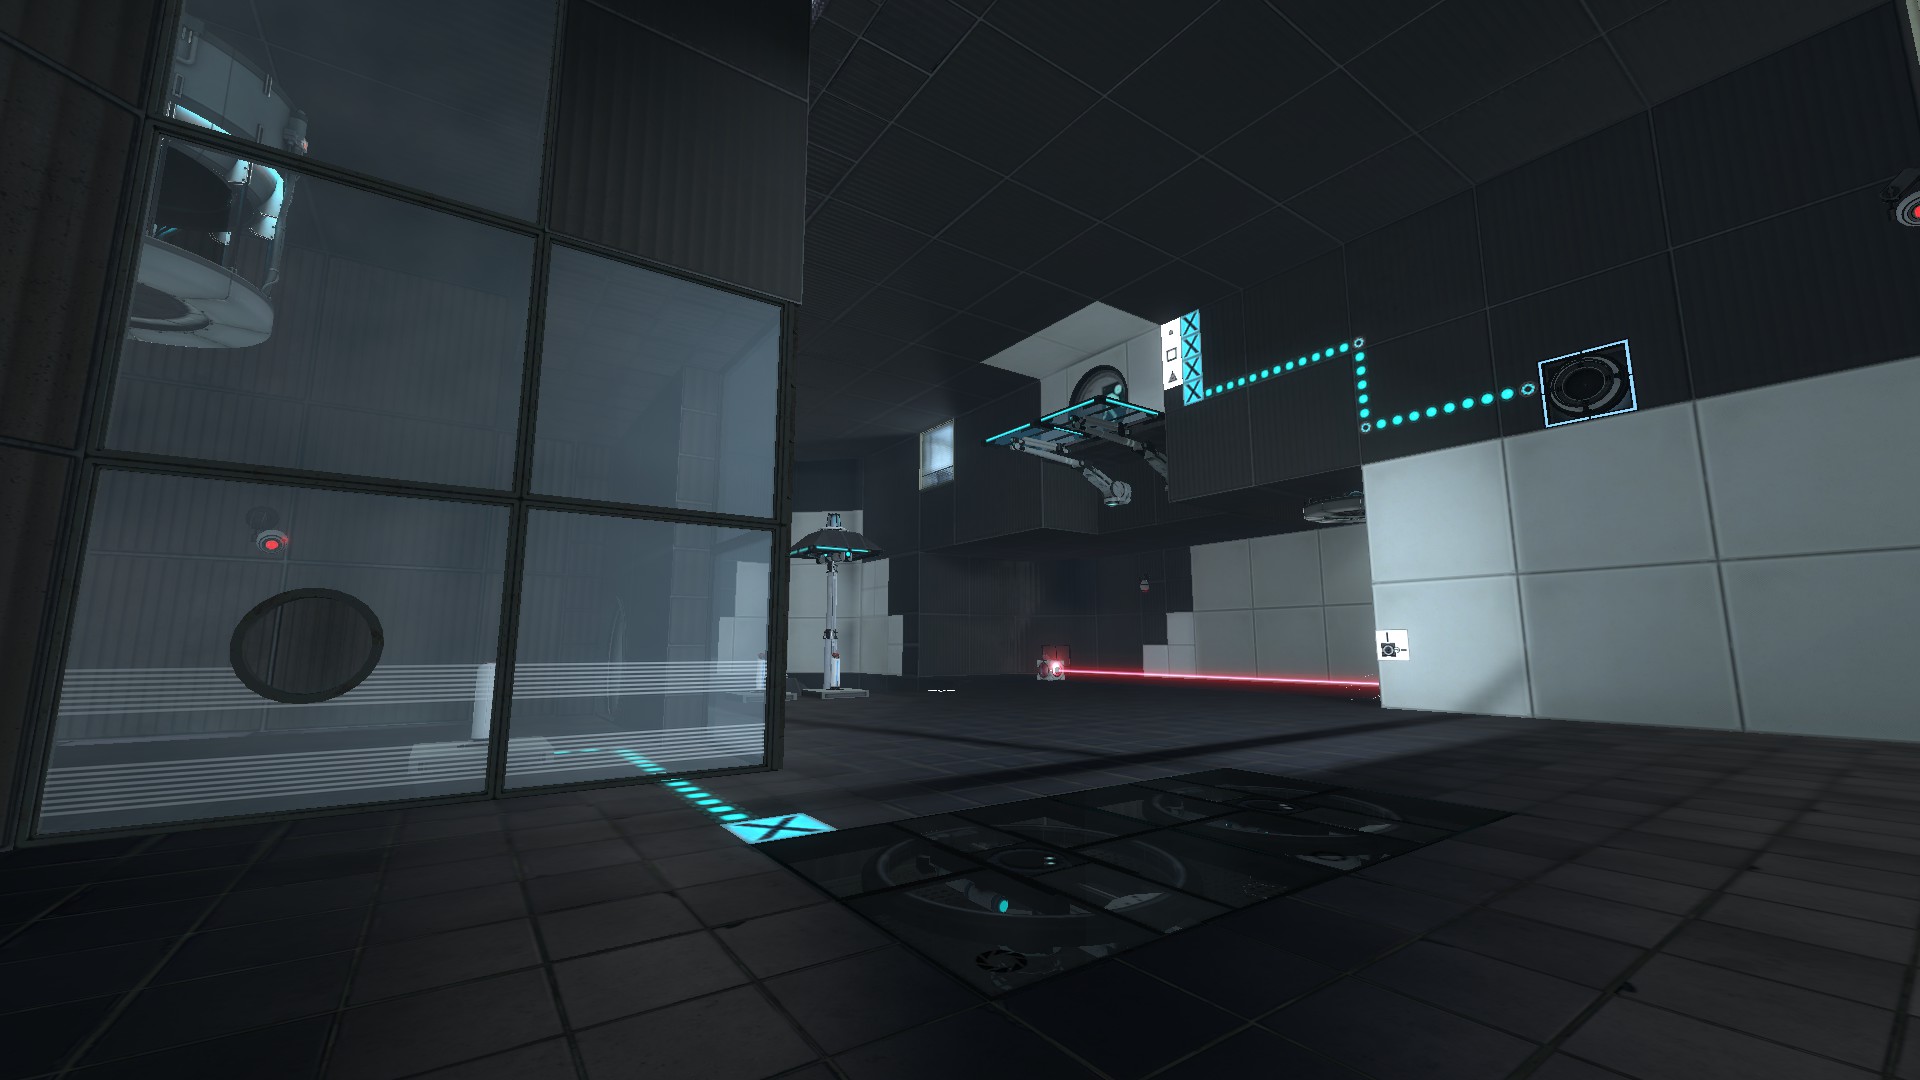
Laser Chamber

The laser chamber is the second one I made for the map. After making the order of operations chamber, I wanted to create something that tested a player's spatial recognition and geometrical problem solving skills. Lasers and relays, combined with angled architecture can provide some great opportunities for this.
However, lasers and relays alone were used to a great degree throughout Portal 2's campaign. The challenge here was to make a laser puzzle that played different than puzzles in the campaign, without being frustrating. What came to mind thinking about this challenge was that in every laser puzzle in the Portal 2 campaign, the relays were always static and the player only adjusted the beam or reflecting cube's position. I decided that there was potential in manipulating the relay positions as well.
Creating a hexagonal shape around a group of vertically adjustable relays allowed for a variety of combinations of relay positions. By arranging switches near the edge of the goo pit with the pistons, players could easily hit a switch to raise and lower them. To give the laser puzzle depth, I had another reflecting cube behind a door that the player opens using one relay alignment using one cube, and the exit door requiring another alignment using both cubes. I had a light bridge in the room the players could use that matched the same height as the raised relay position, which allowed the cube to be above ground and create 3D relay alignment gameplay.
The initial implementation showed a lot of promise, but there was a lot of frustration with the light bridge. The bridge is a mechanic that players will spend a lot of time walking on and adjusting its position even if it doesn't need to change. This means the bridge was a major distraction from the laser relay puzzle. The laser relay part of the puzzle looked to be working fine for unlocking the first door and getting the second cube, but the light bridge manipulation made the solution to unlocking the exit door very messy.
To solve the issue, I removed the light bridge entirely, so the focus of the puzzle remains the focus entirely: lasers, relays, and reflection cubes. I replaced the light bridge with a lift that the player activates in the same room in which they get the second laser cube

Removing the bridge and adding the lift worked great. The puzzle's solution was clearer, with the red herrings coming from the laser, relay, cube, and portal positions instead of an unrelated mechanic not used in the actual solution.
Cube Co-op Chamber

The cube co-op chamber was the last one created for the map. From a pacing standpoint, the fizzler chamber and the laser chamber were both gameplay dense and difficult to solve in their own way. Playing two back-to-back chambers without a mental break between them could have a negative impact on the overall experience even though the chambers themselves play well. Therefore, the cube co-op chamber focuses on the more physical, flinging gameplay instead of the mental problem solving gameplay to give the brain a break.
One of the puzzles in the co-op campaign of Portal 2 required players to fling themselves against timed buttons within a close time interval of each other to open a door. I enjoyed that use of the timed buttons, and wanted to recreate that experience in a single player fashion. Utilizing everyone's favorite cube (the companion cube!) and portal flinging, players can hit multiple timed buttons to unlock a door.
The initial implementation had the companion cube dispenser on the ceiling, with portal surface underneath its switch. Each timed button had angled portal surface platforms coming out from the wall, and faith plates that took the player on a ride into the other angled portalable platform. All the puzzle elements were arranged in an intuitive way so figuring out how to hit the switches didn't require much thought. The primary piece of the puzzle players would figure out is setting the cube along the same faith plate track players used to fling themselves, and have the cube fling toward one switch while the player flings toward the other

The initial implementation worked very well as it was. All the playtesters solved it and enjoyed it. The most common critique was that it was too easy, but being that the goal of this chamber was to be easy-but-fun, that critique was ultimately a good thing. Minor adjustments in the scale of the room and platform positions were made, but nothing as big as the other chambers' changes were needed.
For Reals
Now that each chamber’s gameplay was determined, the entire experience start to finish needed to be realized in a single map. Lots of the time spent here was making sure the overall pacing of the map felt right, adding in the visual and audio touches to make the map feel like a complete experience, and looking for and fixing bugs impeding the complete experience.
The first step was moving all the chambers into one single map. I decided to place the fizzler chamber first and laser puzzle last. The laser puzzle felt like the best choice for being the finale chamber as the player unlocks the room with the laser relays all lining up. Portaling through a door from standing on buttons felt like a less exciting exit.
After migrating the chambers into one map and adding the geo needed to connect them, the next step needed was adding the entry and exit elevators. Thankfully, this was much easier to do in Portal 2 than it was in Portal 1 due to the instance tech (thanks Valve!).
Now that players could enter in an elevator, play all the chambers, and leave in an elevator, the map needed ambiance. The next step involved adding ambient audio, background music, and GLaDOS voice lines. Visual detailing with textures, light fixtures, observation rooms, and security cameras also give the map the touch needed to make players feel like they're playing a real Portal 2 map.
Playtesting and iterating continued during this phase. Rather than looking at how a chamber plays, the playtesting here was looking for how the overall experience (the gestalt) felt in addition to trying to find ways to break the map. Iterations here were primarily aesthetics and audio based, such as changing what music is used for what chamber and how often GLaDOS would speak. Additionally, finding and fixing bugs to make sure the map's quality was high took some time.
Polish and Optimization
By now the gestalt experience was playing well. The remaining work left was putting on the final touches and making sure performance was good. Most of the time spent was on optimizing as well as looking for and fixing bugs, but a few more final touches on detailing were also done. I did a final detailing pass, a lighting and shadow pass, double checked the area portaling on the doors, made sure Nodraw textures were on all the brush surfaces not seen by the player, and looked for any hard-to-find bugs.
“Done”

Now Cubi was ready for release! It was submitted to several different Portal 2 community and mod sites. When the Steam Workshop was released, I researched how to take a map made in Hammer and modify it so it can be published on the Steam Workshop.